Web Page Development
Created with Notepad or VS Code.
Modify the file created in your first assignment, save it as index.htm.
NOTE0: Modify your first assignment (index.htm) by adding hyperlinks and the other items listed below.
NOTE1: There is a SAMPLE webpage at the bottom of this page. Modify, expand and improve on it.
NOTE2: Make sure you meet all of the grading criteria shown in the right column, under the heading Points.
NOTE3: Turn in college level, professional work, with full and realistic paragraphs about you or your business.
NOTE4: It is recommended that you set the Windows Explorer to View > File name extensions
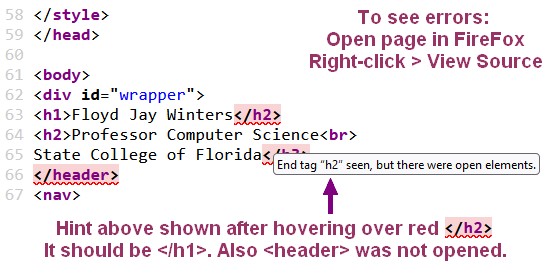
NOTE5: View your page in FireFox, Right Click > View Source to see code. Hover over any red errors for help.
(See sample FireFox screen capture showing most errors at bottom of page)
NOTE6: If you did not get a 100 on a past assignment, look at the grade comments. Do not repeat the same errors.
Please watch this short 3½ video on links:
https://www.youtube.com/watch?v=KeAX8X8PAHY&t=1s
Please watch this 8½ video on links:
https://www.youtube.com/watch?v=pTpkvZhoZM4
Description: During the next few weeks you will continue building the Home page for your "portfolio" Business or Personal website. Then, later in the semester, you will add a Resume page, a Portfolio page, a Newsletter page and a Contact page. All pages should have appropriate, realistic and college level content, with full paragraphs. Do not use sample or "lorem" filler text on your webpage. You will add the hyperlinks and html tags and content shown below to your existing index.htm file. Improve your current home page, do not create a new index.htm file. (Note: index.htm must be in lower case for it to work online.) This is your website, about you. So try to make it look professional, something you feel proud of. In the next couple weeks you want to create something you would feel good about showing to a potential employer.
This assignment is to be created in HTML using the code shown below. Do not use WordPress or another Content Management System or a Website Builder. Once you learn HTML and CSS, then you will be able to use WordPress or another CMS during the last half of the course.
Next week you will have to put this file online in order to receive full credit. You can purchase a domain and hosting through BlueHost.com or GoDaddy.com. As of 8/15/2024 Blue Host had a special for Domain and Hosting for a total of $24 for a year. See: BlueHostAd.jpg. Do a search for "Godaddy coupons" or "BlueHost Specials" before you spend your money. Both GoDaddy (480-463-8389) and BlueHost (888-401-4678) offer free phone support. Support is a very important feature!
You can use the BlueHost or GoDaddy FileManager (video) to upload or File Transfer your webpages. It's an easy drag and drop. But I recommend that you see the bottom of this page for directions of how to use the faster, free and easier FileZilla app to upload or FTP your files. FileZilla remembers your password and username, and your local and remote path, and can connect easier. (By the way, the remote path for your GoDaddy site is usually under public_html.)
For a short GoDaddy/FileZilla tutorial see: https://www.youtube.com/watch?v=Oim7fUOoZ7E
A Domain Name is an organization, business or personal name on the Internet such as:
IBM.com or SCF.edu or BillSmithOnline.com or BillSmith.net or BillSmith.org or BillSmith.info or BillSmith.biz
When you submit your assignment to the dropbox, just upload the URL which is the web address, for example:
www.BillSmithOnline.com or http://BillSmithOnline.com (Unless you buy a security certificate, it is http://..., not https://...)
Your full Domain name is your Web address. A domain name consists of several parts. The letters www. before the domain name mean that what follows describes the location of a site on the World Wide Web. The last two or three letters of a Web address are known as its top-level domain: .com, .gov, .edu, .net, .org, .biz, .info, .uk ...
A domain name is of no value if it is not hosted on a server. Hosting is when a company owns web servers and allows you to store your web pages on the company servers so your site is available worldwide 24/7. The hosting companies charge a fee, usually $4.00 to $10 a month. Typically, you pay less per month, if you purchase a year or two years of hosting up front. Also you can usually get a better deal if you purchase the Domain Name and the Hosting at the same time.
See 5:12 Minute YouTube Video: FJ Winters: Your First web page in Notepad Video
See 3:40 Minute YouTube Video: FJ Winters: Adding Hyperlinks to a web page (please wait while videos load)
See 3:00 Minute YouTube Video: Create A Website In VSCode In Less Than A Minute!
P 74 Duckett
W3Schools Links Tutorial:
W3Schools Formatting Tutorial:
W3Schools Semantic Structure:
HTML is HTML whether you use Notepad or VS Studio Code or Brackets or Adobe Dreamweaver... You can edit the same file in Notepad in the morning, make more changes with VS Studio Code in the evening and then use Notepad again the next day. But VS Studio Code has good debugging, auto-complete, attribute suggestion/completion, spell check, color coding and many other handy features. I would recommend using VS Studio Code from now on.
(VS Code will automatically add a skeleton html file with the DocType, <head>, <title>, ViewPort, meta tags, <body>, <html> tags and more if you type ! or type html:5 at the start of a new file. - see 3 minute video above.)
As a reminder, you are working on and submitting the same file, index.htm, for the first four assignments. You are adding hyperlinks to index.htm for the second assignment, images for the third assignment, and an internal stylesheet for the fourth assignment. Then we will improve the navigation and use index.htm as a template and copy it to resume.htm, which you will modify appropriately. NOTE: Be sure index.htm or index.html is in all lower case.
Include each of the following in your web page:
Add an External hyperlink such as: <a href="https://ibm.com">IBM</a>
Add a Local hyperlink such as: <a href="resume.htm">Resume</a>
Add an Internal link on the same page such as:
Add a link to an ID, for instance:
<a href="#Chapt1">Chapter 1</a> | <a href="#Chapt2">Chapter 2</a> | <a href="#Chapt3">Chapter 3</a>
<!-- Do not use Chapt1 unless your site has chapters. Use IDs names specific to your site -->
Define an ID -
<h1 id="Chapt1">Chapter 1 (Sample only)
Chapter one content here...
<h1 id="Chapt2">Chapter 2 (Sample only)
Chapter two content here...
Add an Email link such as: <a href="mailto:Name@host.com">Name@host.com</a>
Add a Phone link such as: <a href="tel:18885550000">(888) 555-0000</a>
Add the tags and features listed below:
<meta name=", <header>, <nav>, <a href=">, <footer>
Go to the bottom of this page to see the code that you can copy for a short sample web page.
It is highly suggested that you create a folder called YourDomainName.com (such as BarbsBoutique) in your C:\Users\UserName\Documents\My Web Sites folder. Then save index.htm to YourDomainName.com folder. Later, you can drag a copy of this folder from your hard drive to your USB thumb drive as a backup.
Free Online HTML Tutorials
Interactive W3Schools Hyperlinks TutorialNotepad Tutorials: FirstWebPage.htm | Hyperlinks.htm | Meta Data
Win Web Tutor
w3schools HTML Tutorials and sample Quizzes
Make sure you MEET ALL GRADING CRITERIA below.
<a href="index.htm">Home<a>See bottom of this page for code you can copy for a short sample web page.
Only use Notepad, NotePad++, or VS Code for this assignment.
I supplied you with online tutorials, examples, and page numbers.
If you need more help: Google :-)
<meta>Meta tags and meta data store background information about a web page or site, such as the description and keywords that are used by many search engines.
<meta> tags are placed within the <head>
tags,
after the <title> tag. Each page should have a unique meta description.
<meta> tags for Author, Description, and Keywords
after the closing </title> tag in the
<head>
section of your web page. For example:
</title><meta name="author"
content="Prof Winters"><meta name="description"
content="Web Page Development syllabus, use about 150 characters...">
<!-- Each page unique --><meta name="keywords"
content="HTML tags, Web code, web programming">
</head>
See Notepad Tutorial: DOCTYPE, Metadata, Meta tags
See Simple Sample Web Page below
<!DOCTYPE html> 5pts
(p 181)
<html>
<head>
<title>
<meta>
This page and all future pages must have these two meta tags
5pts meta author
5 meta description
(p191-192)
HTML5 introduced the <header>, <nav>, <main>, <section>, <aside> and <footer> elements for pages/columns that could be
adjusted for smartphones. laptops, and Desktop PCs. This is referred to as Responsive Design - responding to the width of various devices.
<aside> is often used for a second column on a PC, but it stacks under <main> on a smartphone.
Notice the color coding at left which is used to represent the organized structure of HTML5 web pages.
Setting a max-width makes it easier to read long paragraphs. You may choose a max-width of 1000 or 1200 pixels. The margin: auto will center the page.<header> <!-- masthead before or inside main -->
</header>
<nav> <!-- navigation before, after or in header -->
<a href="index.htm">Home</a>
|
<a href="resume.htm">My Resume</a>
| ...</nav>
<main> <!-- main content goes here -->
<h1>Heading for page</h1>
<p>Barb's Boutique specializes in...</p>
<p>Second paragraph...</p>
</main>
<aside> <!-- used for optional second column -->
</aside>
<footer> <!-- add Email, phone, address... below -->
</footer>
</body>
<main>
See Structure below
(p 432-433)
Use real or realistic content about you or your job. If you are just starting out, it can be aspirational.
Add an <h1> tag either inside the <header> or at the top of the <main> element.
Continue from the previous assignment and have at least three college level paragraphs describing your website. Make it read and sound good!
This will be your real site in a short while.
<header>
One <h1> at top
At least three <p> tags
(p 432-433)
("Relative" because the entire path is not needed. Relative files are on the same website, often even in the same folder.)
Feel free to create temporary place-holder pages to link to. For instance, resume.htm:
<html>

		<body>

		 <h1>
My Resume</h1>
<p>Quick Temporary Content</p>
</body>

</html><html> and <body>
tags and an <h1> tag that reads Resume, as shown to
the left.)Add the
<nav> element, then insert a relative link
from index.htm to resume.htm.
Example:<nav>
<a href="index.htm">Home</a>
|
<a href="resume.htm">My Resume</a>
|
<a href="contact.htm">Contact Me</a>
</nav><nav>
(p 434)
<a href="...>
a relative link to a page on the same site. (p 80)
(you do not yet need content for resume.htm)
(An "Absolute" link has the entire URL path to another page; it includes
http:// and the domain name. Absolute paths typically are links to other websites.)<a href="https://ibm.com" target="_blank">IBM</a>(The
target="_blank" will open it up as a new page.)Often you will simply copy the entire URL from the browser address bar and paste the copied URL into the href tag.
See Notepad Tutorial: Adding Hyperlinks
<a href="http://...
or <a href="https:
an absolute link
(p 77, 79)
S in https is for secure/encrypted.
It is an extra cost.
"Internal" links go to a different location on the same web page. These locations or sections are given a unique ID.
An ID attribute specifies a unique section identifier for an HTML element. Ex:
<h2 id="Topic1">Topic 1</h2> Use the # sign when linking to an internal ID with the
<a href> tag.
Ex:<a href="#Topic1">Topic 1</a>Later on when stylesheets are covered, an ID may refer to a styled section that has certain style properties, such as a #wrapper that surrounds a page with a background color, a border, and some padding. Or an #infobar which might contains styles for a page banner with inverse colors..
In DreamWeaver: Insert | Hyperlink
or id="AdminStaff", id="SalesStaff", id="ITStaff"...
or id="Education", id="Employment", id="References"...
IDs should not contain spaces. But the linked text may include spaces. See below:
First, create one or more named IDs:
<h2 id="Topic1">Topic 1</h2> (Sample only)Topic 1 content goes here
<h2 id="Topic2">Topic
2</h2> (Sample only)
Topic 2 content goes hereNow possibly near the top of the page you can link to these IDs:
<a href="#Topic1">Topic 1</a> | <br>The line above will link to the Topic 1 ID anchor:
<a href="#Topic2">Topic 2</a>The line above will link to the Topic 2 ID anchor:
The older "
<a name="Chapt2"></a>
<a href="#...
an internal link to an ID on the same page.
(p 87)
Test it
The internal links could go to Chapter 1, Chapter 2...
or
Education,
Work History...
or
Our History,
Our Mission...
Add your own IDs and content relevant to your site.
<footer> element just
before the closing </body> tag. Footers usually include copyright (c) and contact info such as email and telephone.<footer>
(p432-433)
If the link is clicked it starts a client side email process, such as Microsoft Outlook.
<footer>
include a working link to your Email address and phone:<footer>
Contact Me:<a href="mailto:me@host.com">Me@host.com</a></footer>
</body>
<a href="mailto:
(p 55, 85)
Test it
If the link is clicked on a smartphone it will dial that phone number. If you feell uncomfortable putting your real phone number online, make it 941-555-5555.
<footer> include a working link to your Email address
and phone:<footer>
Contact Me:<a href="mailto:me@host.com">Me@host.com</a>|
<a href="tel:18885550000">(888) 555-0000</a></footer>
</body>
<a href="tel:
Test it
Main HTML 5 semantic Elements:
Comments are ignored by the browser.
They begin with <!-- and end with -->
<header> <!-- masthead banner, logo -->
<nav> <!-- for menu navigation -->
<main> <!-- main content -->
<aside> <!-- 2nd column -->
<footer> <!-- often © & contact info -->
<header> <!-- masthead before or inside main -->
</header>
<nav> <!-- navigation before, after or in header -->
</nav>
<main> <!-- main content goes here -->
<h1>...</h1>
<p>.....</p>
</main>
<aside> <!-- used for optional second column -->
</aside>
<footer> <!-- Email, phone, address... -->
</footer>
</body>
(p 182)
<body style="color:...

		<div style="border:...

		<span style="font-size:

		<p style="font-weight:

		<h1 style="font-family:

		<table style="width:
If you know how - feel free to use a stylesheet instead of inline styles. We will cover stylesheets with colors and borders and much more shortly.
<h4 style="font-size:18px; color:#0000FF">Blue</h4>Or
<p style="color: blue; font-size: large; font-family: Arial;
		font-weight: bold">
Big, Blue and Bold</p>Using the
style attribute, set at least two different colors and sizes.
Remember: Roses are FF0000 and violets are 0000FF.See Notepad Tutorial: Web Page Colors
<div> is for a big section, like a portfolio column or wrapper<span> is often for a few words, perhaps inside another tag.Note: These are an inline styles. It is far better to define
<h1>, <h2>, <p> tags in a stylesheet, which will be covered later.
Use <div> and <span> tags to organize your page and make your content look good.
(p 187)
Use some inline styles to enhance your page.
<span>Used to make settings to a few words or small section of a page
<span> tag to add some
color or other style to a few words of
text on your page. For example: This is a blue word.This is a
<span style="color:blue">blue</span> wordALL tags should be in lower case.
Use instead:
<p style="text-align:center; font-family:arial; background-color:#FF0">
or use<div style="width:80%; margin:auto">Double-click on index.htm to open it in a browser.
Make sure you bring this file to class each session. You will add tags and content to this file in your next few assignments.
To edit an existing .htm file: Open Notepad and choose File > Open or right-click on your file and choose Open with Notepad.
Save your file with an .htm or .html extention.
Do Not upload .Zip Files to the assignment dropbox.
A basic Sample web page created in Notepad.
This sample is just a short demo. Your page will be much longer as you prepare to do a real home page.
Notice how the tags are "Nested." See color structure at right to see the pattern of how tags are opened and closed within another.
You can copy and paste the code to the right directly into Notepad. Save
it as Sample.htm. Double-click on Sample.htm to open it in your browser to see
how it works.
Wide text blocks are hard to read. So it is wise to give your body a maximum width using a style. The margin: auto at the right will allow the content of the block to be centered on the screen.
But make sure YOUR ASSIGNMENT HAS YOUR CONTENT which is related to your site. Start working to make your page look college level with full and realistic paragraphs.
Your website should have real or at least aspirational content. But if you find that will not work, it can be fictional if you add a disclaimer at the bottom. But either way - I hope you have fun building your site.
<!DOCTYPE html>
<html>
<head>
<title>HTML Link Demo</title>
<meta charset="utf-8">
<meta name="author" content="Your Name">
<meta name="description" content="Describe Your Site">
</head>
<header>... ...</header>
<!-- This line is a comment line. It is ignored by the browser. The header element often contains a background banner image and or a logo. Add later -->
<nav id="Top"><a href="index.htm">Home</a> |
<a href="Resume.htm">Resume</a><br>
</nav><main>
<h1>Page Title</h1>
<p>Barb's Boutique specializes in...</p>
<p>Add more real text/content here.</p>
<p>Use <b>bold</b> somewhere</p>
<h2 style="color:blue">Our Products</h2>
<p><a href="http://msn.com">MSN</a></p><br>
</main>
<footer style="background-color:yellow"><a href="mailto:me@host.com">me@host.com</a>
| <a href="tel:18885550000">(888) 555-0000</a><br>
<a href="#Top">Top</a><br>
</footer></body>
</html>
Upload index.htm or your URL web address to the online Canvas dropbox.
ex: http://yourDomainName/index.htm
Upload your webpage or URL web address to the SCF Canvas online [Assignment Dropbox].
No Zip files!
They are a virus risk.
You will lose 3 points for each day late.
Notice how all the content that will appear on the page is between the <body> tags.
Preview your page in Firefox, then right click and choose View Source, and look for any errors displayed in red. Hover over flagged errors for hints. -3 points for each error. (Later -5pts, then -10pts)
Note: the line in red may be OK, but it may be flagged due to an error above it.
Helpful hint: Preview your page in the Firefox browser, (it's a free download). Then right click and choose View Source, you will see the html code and any errors displayed in red. If you hover over the flagged error, FireFox will often give you a further explanation of that error. Sometimes the flagged line is OK, but it is in red because a tag somewhere above the line was not properly closed. (It's like pollution contaminating the water downstream.) You will lose at least 3 points for each error for the first assignments. Later you will lose 5 points, and then 10 points for each error. Let FireFox help you get good grades. See below:
Return to Top of Page
1. Use a File Manager or FTP
to transfer your
index.htm file and other .htm files to the
public_html folder of your online website.
Create an online images folder and upload
your images to the images folder.
2. Confirm that everything works online, then copy the entire URL web
address. Make sure the URL address you submit will work on all
computers. Consider testing it on your cell phone.
3. Paste the complete URL address into the
Message portion of the SCF Canvas
[Assignment Dropbox] for this assignment.
See: 2820Web/GoDaddyFileManager.pdf
(When using the GoDaddy cPanel, you may have to navigate to public_html on the remote site.)
However, it is far easier for you to use a program like FileZilla, which is a great drag and drop application to FTP (File Transfer Protocol) to upload files to the remote server or host. This free popular program will remember your UserName, Password and the local and remote folder locations.
A. Downloading FileZilla FTP client:
https://filezilla-project.org/download.php
B. Configuring files with FileZilla:
https://youtu.be/Jo-9l3ceo1I (1:55)
C. Uploading files with FileZilla:
https://youtu.be/y-_BPfKclh8 (1:34)
When done, paste the complete URL address of your project into the Title and Message portion of the SCF Canvas [Assignment Dropbox] for this assignment so that I can easily copy and paste it into my browser when I grade it.
Future projects will receive a 0 if not live online.
-3 points for each day late.
There is an entire chapter in one of the online eBooks on Domain names, FTP, uploading and hosting.
See http://faculty.scf.edu/winters/0ClassFolders/2820Web/eBook-Springer/HTML/Murphy07Hosting.pdf
| The root folder of your actual local C:\Users\UserName\Documents\My Web Sites\YourDomainName and the pubic_html folder in the remote (webserver) website should look now like this: | |
| images [Dir] | This is a subFolder - All images except possibly favicon.ico go here |
| index.htm | Your Home page (index must be in lower case to work online) Do Not upload .Zip Files |