Web Page Development
Modify the file created in your first assignments, save it as index.htm.
NOTE0: Modify your first assignment (index.htm) by adding an internal stylesheet and the other items listed below.
NOTE1: There is a SAMPLE webpage at the bottom of this page, and on almost every other assignment sheet.
NOTE2: View your page in FireFox, Right Click > View Source to see code. Hover over any red errors for help. -10 for each
You can also highlight and copy all your code, paste it into Edge's Copilot, or Chrome's Gemini, or... and ask: Check for errors.
NOTE3: If you did not get a 100 on a past assignment, look at the grade comments. Do not repeat the same errors.
NOTE4: There is no need to purchase an expensive Security Certificate in this class. So for most of you, your website address should be http://site.com not https://site.com. Typing https://site.com without a secrurity certificate will give an error.
Please watch this 4 minute video on Internal Stylesheets:
https://www.youtube.com/watch?v=3y5Aw4RZIQQ
Description: This is a continuation of your first assignments as you build a 5-page "portfolio" Business or Personal website for yourself. Use Notepad, the free Notepad ++ or the free VS Code to improve and add an internal stylesheet to index.htm, which is the same file used for the first two assignments. All pages should have college level content using realistic text, links, and images that relate to you or your business. Do not use any sample or "lorem" filler text for your submission for a grade. See below for sample code. But make sure you add to and modify the sample code below to your text, your styles, font-sizes and font colors. Make your <nav> look attractive. For a live sample showing the html/css (stylesheet) structure, see: .../DivDemo-VerySimpleNav.htm
This assignment is to be created in HTML using the code shown below. Do not use WordPress or another Content Management System or a Website Builder. Once you learn HTML and CSS, then you will be able to use WordPress or another CMS during the last half of the course.
Your files must be online for full credit. If they are not uploaded to your website, you will lose 20 points. Submit your URL/Web address to the assignment dropbox. There is no longer a need to upload index.htm to the dropbox.
Our course is Web Page Development, not Desktop Development. I cannot grade several webpages, multiple images, folders, and your stylesheet each week unless they are properly uploaded and organized online. You can purchase a domain and hosting through BlueHost.com or GoDaddy.com. As of 8/15/2024 Blue Host had a special for Domain and Hosting for a total of $24 for a year. See: BlueHostAd.jpg. Do a search for "Godaddy coupons" or "BlueHost Specials" before you spend your money. Both GoDaddy (480-463-8389) and BlueHost (888-401-4678) offer free phone support. Support is a very important feature!
If needed, email me your phone number and two convenient times, and I will choose one to set up an online Teams meeting with you to help upload your website. Make sure to have your password and login ID available. Note: I can assist only after you have purchased your domain and hosting plan.
See Styles Tutorial: https://www.bradentonwebsitedesign.com/NotePad_Tutorials/Styles.htm
Short Interactive Tutorials:W3Schools Internal Styles:
W3Schools IDs Tutorial:
W3Schools Classes Tutorial:
W3Schools Blocks Tutorial:
W3Schools div Tutorial:
W3Schools span Tutorial:
W3Schools px and em Tutorial:
This assignment must be online. See: GoDaddy_FileManager_and_FTP_clients.pdf
Note1: After you upload your changes, you may have to tap the Refresh icon or tap [F5] to Refresh your HTML code.
Note2:
On some laptops, you may have to tap the [Fn] key + [F5] to Refresh.
Note3: Sometimes you must tap [Ctrl] + [F5] to force a Hard Reload to display the most recent images, styles and scripts.
It is highly suggested that you have a folder called YourDomainName.com in C:\Users\UserName\Documents\My Web Sites folder. Have an images folder in your YourDomainName.com folder. All your files - index.htm, portfolio.htm, resume.htm - will be stored in YourDomainName.com and each image is stored in the images folder. Later, you can drag a copy of this folder from your hard drive to your USB thumb drive as a backup.
The <div> tag defines a division or a section in a webpage, such as a wrapper div (to surround the main content so that it can have a
consistent border or size) or a social div for Facebook,
Twitter and YouTube, or a column1 and column2 div... The <div> tag is used to group block-elements to set their format properties in a stylesheet.
See Sample Div page
with Wrapper ID.
The <span> tag formats a smaller section of a page. For example:
<p>This is a <span style="color:blue">blue</span> word.</p>
An Internal Stylesheet is used to set desired format properties for existing HTML tags or to define custom selectors. Internal Stylesheets are defined within the <head> section of a web page.
Selectors are style names given to elements in a stylesheet. They use this syntax: Selector {Property: Value}
Examples: body {width:900px; margin:auto} or .important {color:red} or #masthead {background-color:#9FC}
There are 3 main types of selectors used with cascading styles.
1. Type Selectors - Existing HTML tags. Such as: <body> or <h1> or <p>
Syntax: Tag {property: value; property: value; }
Examples:
<style type="text/css"> /* this is an Internal stylesheet in the head tag */
body {width:1000px; margin:auto} /* center page on screen (set between 800 to 1200px) */
h1 {font-family:Arial, Helvetica, sans-serif; text-align:center; color:#036} /* dark blue */
img {max-width:100%; height:auto} /* for Responsive Website Design, resize images */
header {background-image:url(images/banner.jpg); background-color:#ccc} /* silver */
nav {text-align:center; padding:12px; background-color:#CCF} /* light grey blue */
main {color:#009; background-color:#FFC} /* dark blue on light yellow */
footer {color:#FFF; background-color:#369; font-size:10px; height:30px; text-align:center}
</style>
Unless there is an inline style or internal stylesheet to override the properties above, all
header, nav, h1, h2, hr, p or img tags in the website will inherit the properties defined in the external cascading stylesheet.
2. ID Selectors are typically used in a stylesheet to define a division on a page. They start with a #.
They are only used once and should not be reused - only use a particular ID one time per page.
Syntax: ID {property: value; property: value; }
Examples:
#wrapper {background-color:#FFF; border: 2px #009 solid} /* dark blue border */
#social {background-color:#FF0; border: 2px #009 solid} /* yellow with dark blue border */
In the <body> the IDs are called with the syntax id="idName" as shown
with the wrapper ID that surrounds the content in the body below. (You can copy and paste the styles above into the head section, and paste the divs below into the body section and easily test this code.)
Structure your site with the semantic HTML5 elements below (<header>
<nav> <main> <section> <footer>) on your page.
NOTE: Just like a student can only have one student ID, a div can only have one ID.
<body><div id="wrapper"><header>Masthead content, such as a banner image, logo, or website name goes here...
Set image in your stylesheet - background-image:url(images/banner.jpg)
</header><nav><a href="index.htm">Home</a> |
<a href="resume.htm">Resume</a> |
<a href="contact.htm">Contact</a>
</nav><main><h1>Main Heading</h1>Main content goes here, such as paragraphs or images.
You could use the <section> instead of <main>
</main><div id="social>
Facebook
| Twitter | YouTube links may go here...
</div> <!-- close social-->
<footer>
Footer info such as author and copyright goes here
</footer>
</div> <!-- close wrapper-->
</body>
Add closing Comments after each closing </div>
as shown above for </div> <!-- close wrapper-->
3. Class Selectors are custom named and defined styles attributes that may be reused multiple times per page. They start with a period (.)
Examples:
.chapterTitle {font-size:28px; color:#000080} /* navy blue */
.important {color:red; font-weight:bold}
.highlight {background-color:#:#FF9} /* yellow */
In the actual HTML code classes are called in the following manner:
<span class="chapterTitle">Chapter 1</span> or <p class="important">Notes:</p>
Free Online HTML Tutorials
Interactive W3Schools Styles TutorialInteractive W3Schools Classes Tutorial
Interactive W3Schools ID Tutorial
Notepad Tutorials: Styles
Simple Div Page Demo with Wrapper ID
Simple HTML5 Element Demo with Nav
Win Web Tutor | HTML Tags | Favicon
Make sure you MEET ALL GRADING CRITERIA below.
<style>See bottom of this page for code you can copy for a short sample web page.
Start an Internal Stylesheet that is placed within the
<head> tags, under the <title> tag, and usually follows the <meta> tags. External stylesheets are preferable and may be used instead, but this is only an intro assignment.First, set at least 4 existing Tag Selector properties: such as body, header, h1, h2, p, hr
Note1: Content is not placed within the <head> section. However, info about the content or the way content is displayed (style) is placed within the <head>.
Note2: It does not look professional to center all the content on the page.
Note3: You may have multiple styles defined, but you typically only use one <style> tag per webpage.
The <style> tag is placed within the opening and closing <head> tag.
            <html>

		<head>

		  <title>Page Title</title>

		  <meta name="description"... >

		  <style>internal styles</style>

		</head>

            <body>

		  <header> banner image </header>

		  <nav> Menu Navigation </nav>

              <main>

		  Main page content. H1, P tags...

              </main>

		<footer> © / phone </footer>

            </body>

            </html>
Instead, stet the style for all <h2> tags in the stylesheet.
Create a single Internal Stylesheet within the
<head> tags and set existing Tag Selector attributes
for at least four (4) different HTML tags. Set the <body>, <h1>, <h2>, <img>,and <p> properties for such attributes as background-color, width and font... Also set the style properties for at least one other HTML tag, such as nav, footer, h2, h3, hr...If your first line of code is
<!DOCTYPE html> then setting a body width and a body margin attribute will center your webpage. For example:
<style type="text/css">
/* Tags and Elements defined below */
body {width:1000px; margin:auto; background-color:#FFC;}/* Width/Margin to center page on screen */
h1 {color:blue; font-family:Arial, sans-serif}p {font-size:14px; font-family:Tahoma, Geneva}/* if Tahoma font not found, use Geneva */
img {max-width:100%; height:auto}header {background-color:#369 }nav {text-align:center; padding:12px; background-color:#CCF} /* light grey blue */main {color:#009; background-color:#FFC; padding...} /* dark blue on light yellow */footer {color:#FFF; background-color:#369; font-size:10px; height:30px; text-align:center}</style></head>Set your own attractive colors and fonts and styles.
For a live sample showing the html/css structure, see:
.../DivDemo-VerySimpleNav.htm
Set your own colors and styles.
Add some padding to the containers, like <main>, so the text is not jammed next to the borders.
Be sure to open your file in FireFox, Right-click and View Source to check for errors, shown in red.
<...style="...>Set tag attributes
No Inline styles
Set existing Tag Selector properties for 4 different tags.
Just use one internal stylesheet for all internal styles, which means only use the open <style> tag one time.
Center the page on the screen, but do NOT center all or even most of the page's content.
If you know how - feel free to use an external stylesheet instead of an internal stylesheet. We will cover external stylesheets shortly.
(p 236)
	  <header>
<nav> <main> <footer><section> and <aside>(p 432-533)
Continue Internal Stylesheet Define and set properties for at least 2 ID Selectors (#) that are used with
divs,
such as #wrapper (for everything), or
#column1, #column2, or
#social
for your Social Navigation, LeftColumn, RightColumn, ...
Note: When possible, use the newer HTML5 semantic elements instead
of creating many of your own IDs.
Such as the section, aside, and footer elements:
<section> instead of #LeftColumn
<aside> instead of #RightColumn
<footer> instead of #footer
or #social and at least two other ID Selectors or HTML5 elements. For example:
<style type="text/css"><style type="text/css">
/* Tags and Elements defined below */
...
...
/* IDs are defined below */
#wrapper
		{background-color: #FFF; border: 2px #009 solid}
/* dark blue border around page */#social {color:#FF0; background-color:#009}#column1 {background-color:#FFC; width: 60%}
#column2 {background-color:#FCF; width: 30%}10 pts
Define and set properties for at least 2 ID Selectors, such as
<div id="wrapper">
(p 187)
Note: tags like <div>, <nav>, <header>, <footer> are parent tags and cannot be the child or nested within tags like <p> or <li>
Continue Internal Stylesheet Define and set properties forat least 2 Class Selectors (#) that are used to define named custom styles, such as .important, .signature, .keyterm, .caption, .box, .line, .chapter...
For example:
<style type="text/css">
		   /* Tags and Elements defined below */

		  ...

		  ...

		   /* IDs are defined below */

		  ...

		  ...

 /* Classes are defined below */

 .important {color:#C00}
		/* darker red */

 .highlight
		{background-color:#FF9} /* (yellow) */
        </style>
(10 pts each)
<...class="...>Define and set properties for at least 2 Class Selectors in the stylesheet and use both classes in the body.
(p 184)
<div>Used to make settings to a division or section of a web page, such as a
wrapper or social or column1, column2
or ....
(Later your div tags will be used with section IDs defined in your external Cascading Stylesheet.)
Also structure your site using the semantic HTML5 elements:
<header> <nav> <main> <section> <footer>
<div> is for a big section, like a portfolio column or a wrapper<span> is often for a few words, perhaps inside another tag.
<div> command to set at least two (2) separate sections of your web page
using each ID defined in the Internal Stylesheet. For example:
<div id="
wrapper">Other divs and semantic elements go inside the wrapper
</div> <!-- close wrapper -->
<div id="
social">Facebook | Twitter | YouTube ...
</div> <!-- / social -->
Add Closing Comments after each closing Div
<div>
Required:
Comment every closing div tag as shown. -3pts for each missing comment.
<span> to mark a small area, and give it a class. Classes are custom attributes defined in stylesheets and begin with a period (.)
Example:
<p class="important">Read this</p>.or
Please
<span class="important">read this</span> memo.Notice the class .important was defined above in the internal stylesheet.
<span class="...>Use at least one <span> tag
A comment is a remark or note used to document how or when or why something was done within a web page. It is for documentation only, and is ignored by the browser and not displayed on the screen.
/* 2 lines above:  center page on screen */

      </style>
Below is an example of an HTML comment that is ignored by the browser and not displayed on the screen:
</div> <!-- close wrapper -->
or
</div> <!-- / wrapper -->
Use at least 2 stylesheet comment: /*
Use at least 3 HTML
comments: <!-- You need a comment for each closing Div. -->
<body> width (perhaps to 1000px or 1200px or 90%) Set the desired <body> background color in your internal stylesheet. Center the page on the screen, but do not center all of the content. See sample code below. <nav> look very nice, set the font-size, font-color, and background color to the styles that best match your website theme. Play with the px or em unit. See sample below.In the end your pages should be organized like the sample structure and template shown at right.
The Internal Stylesheet is in the <head>.
The <body> is after the <head>
This is very straight forward and logical.
Notice how
tags are Nested (see matching colors).
Notice there is no "Content" in the
<head> tag, which is different from the <header> element in the body.
You can either create an internal stylesheet in the <head>, or
if you know how, you can link to an external stylesheet from within the
<head> (next week's assignment.)
In place of the internal stylesheet you can link to an external stylesheet:
<link href="styles.css" rel="stylesheet" type="text/css">
In the meantime, you can
actually copy the code at right as a template and fill in your real content as you set up
your page.
Note: Using margin:auto with a body width will center your page on the screen.
<!DOCTYPE html>
<html>
<head>
<title>Title here</title>
<meta charset="utf-8">
<meta name="description" content="Page Description">
<meta name="viewport" content="width=device-width, initial-scale=1.0">
<style>
body {width:1000px; margin:auto}
/* center page on screen */
h1 {color:#036; font-family:Arial, Helvetica, sans-serif; text-align:center}
img {max-width:100%; height:auto}
/* for Responsive Website Design */
header {color:#FFF; background-color:#369}
/* dark blue on light yellow */
nav {text-align:center; padding:12px; background-color:#CCF}
/* light grey blue */
nav a {font-size: 24px; color:#036;}
/* a sets the hyperlink in this case 2x normal */
main {color:#009; background-color:#FFC; padding: 10px}
/* dark blue on light yellow */
footer {color:#FFF; background-color:#369; font-size:10px; height:30px; text-align:center}
/* ***** IDs Below ***** */
#wrapper {border: 2px #009 solid}
/* *****
Classes ***** */
.important {color:#C00} /* darker red
*/
</style>
</head>
<body>
<div id="wrapper">
<header>
Logo and other info
</header>
<nav>
<a href="index.htm">Home</a> |
<a href="resume.htm">Resume</a>
</nav>
<main>
<h1>Your Heading here</h1>
<p>Your Paragraph content from prior assignments</p>
<p>More Paragraph content, links and images</p>
</main>
<footer>
Copyright and Footer info here
</footer>
</div> <!-- /wrapper -->
</body>
</html>
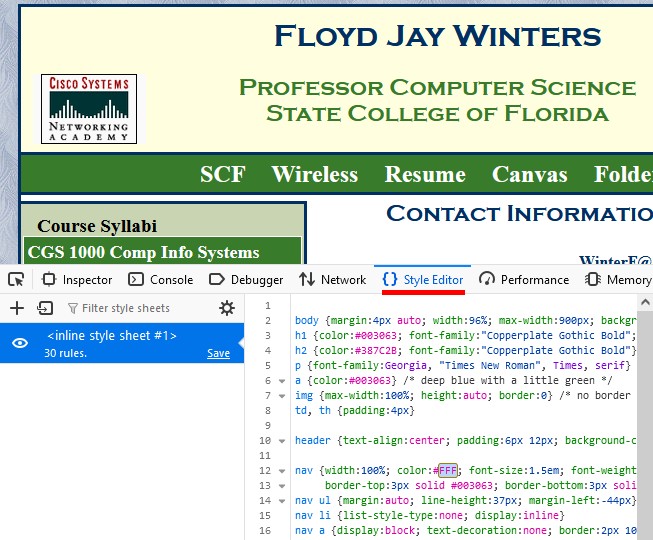
Another way to debug and improve your website is the use the Inspector. The Inspector in Firefox is a very handy tool that allows you to view, modify, and do live tests the CSS styles of a webpage. These live changes to the styles are reflected immediately in the browser. You can edit, add or remove CSS rules and immediately see the results. It is great for debugging layout or design issues on the spot.
1 Right-click in FireFox, or Edge, or Chrome
2 Choose Inspect Choose Style Editor
3 Change the styles to see immediate and live results as you play what if
Changes are only made in the browser, and they are just a temporary view and not saved
Try it - change your colors or font-sizes and see the results immediately.
Add or modify your padding or margins or body width.
Experiment to create the most attractive page.
When done, make the changes in your Notepad or VS Code and save them in your editor.
See sample below.
<link href="images/favicon.ico"
A favicon is used to place your favorite icon in the URL/Address box next to your URL/Address. Make sure your icon has a .ico extension and if you right-click > "Open with" it can open in your browser.
Notice this page has an icon of a spider web in the left corner of the URL/Address box and on its tab in most browsers.
You can see a favicon by typing:
http://yourdomain/images/favicon.ico
See Photo to create:
images/PhotoFiltre-favicon.jpg
See: http://www.xiconeditor.com/
Code for CGS2820 Syllabus favicon (in
<head> tag):<link href="images/favicon.ico" rel="shortcut icon"
type="image/vnd.microsoft.icon">
Code for Google favicon
(in <head> tag):<link rel="shortcut icon" href="
http://www.google.com/favicon.ico"
type="image/x-icon">See Notepad Tutorial: Favicon
Favicon
1. open image
2. crop image
3. size as square
4. edit image
5. resize to 32x32
6. in PhotoFiltre:
Tools >
Export as icon
See Photo: images/PhotoFiltre-favicon.jpg
VS Code is free. It is color coded. It spellchecks for you and underlines flagged words in blue.
-5 points for each spelling mistake
ALL tags should be in lower case.
Use instead:
<p style="text-align:center; font-family:arial; background-color:#FF0">Almost all styles should really be defined in the stylesheet.
ALL tags should be in lower case.
You can back up your individual files that way, or even an entire folder.
1. Use a File Manager or FTP
to transfer your
index.htm file and other .htm files to the
public_html folder of your online website.
Create an online images folder and upload
your images to the images folder.
2. Confirm that everything works online, then copy the URL address.
3. Paste the complete URL address into the
Message portion of the SCF Canvas
[Assignment Dropbox] for this assignment.
There are TWO GoDaddy usernames and PASSWORDS. One is for your GoDaddy account. The other set of credentials is for the cPanel for the GoDaddy File Manager or if you use another app like FileZilla.
To use the GoDaddy File Manager:
Login > My Products > Hosting > Manage > [cPanel] > File Manager > public_html
To see your cPanel settings for your FTP credentials needed for the free FileZilla:
Login > My Products > Hosting > Manage > under Setting you will see your cPanel/FTP login and also the Password textbox.
FileZilla, is a great drag and drop application to FTP (File Transfer Protocol) to upload files to the remote server or host.
This free popular program will remember your UserName, Password and the local and remote folder locations.
A. Downloading FileZilla FTP client:
https://filezilla-project.org/download.php
B. Configuring files with FileZilla:
https://youtu.be/Jo-9l3ceo1I (1:55)
C. Uploading files with FileZilla:
https://youtu.be/y-_BPfKclh8 (1:34)
See http v https
You will lose 3 points for each day late.
Consider testing it on your cell phone.
Test your site on multiple browsers: such as Edge, FireFox, Chrome, Safari and your cell phone.
Preview your page in the FireFox browser, then right click and choose View Source, and look for any errors displayed in red. Hover over flagged errors for hints. -10 points for each error that FireFox displays in red. Note: the html line in red may be OK, but it may be flagged due to an error above it - just as pollution can travel downstream. When I find an error, I must copy it and then paste each error into the dropbox. So it takes me less time and makes me happier when you look for and correct your errors first and you get the highest possible grade.
Make sure your finished resume is attractive and complete, fills a full page and will reflect well on your abilities.
| The root folder of your actual local C:\Users\UserName\Documents\My Web Sites\YourDomainName and the pubic_html folder in the remote (webserver) website should look now like this: | |
| images [Dir] | This is a subFolder under the Root folder.All images except possibly favicon.ico go here |
| favicon.ico | This is often in the images folder. See Favicon Tutorial and Favicon Generator |
| index.htm | Your Home page (usually must be in lower case) |