|
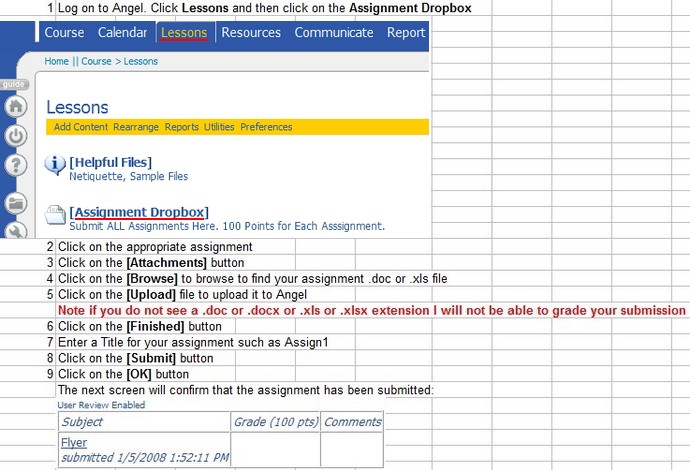
Word Chapter 4: A 2-3 page Sales or Business Proposal Grade Sheet Criteria During the entire course you will be doing Word Processing, Spreadsheets, Database and PowerPoint projects to support a particular business. The business can be real or make-believe. But you will work with the same business throughout this entire Integrated Business Office Applications course, and in the end you will create a valuable online Portfolio Project. So before you start, carefully think about what business you will adopt. Past examples: Beauty shop, Paint ball park, Computer repair, Custom jewelry, a Tattoo parlor, a lawn service … Create YOUR own text, figures, data, and tables. Do NOT use the text from the book. See page sample on Page WD 227. Also see online sample at: http://faculty.mccfl.edu/WinterF/0ClassFolders/1570Office/SamplesPDF and see: Microsoft Word/Office Tips Also see: Microsoft Office and Windows Shortcuts |
||
|
Competency |
Steps |
Points |
|
To Reduce File Size see: faculty.mccfl.edu/WinterF/0ClassFolders/Common/FileSizes-KeepSmall.htm Also, when saving as a PDF there is a radio button option for "Minimum Size.” Check this if your file is too large to upload. |
||
|
Choose and customize a theme that you will use throughout your entire course. Border and Shade a Paragraph. Put company contact info on the cover page – hopefully in an attractive Header with an attractive logo. Place your name (“Prepared by YourName”) somewhere on the proposal – either on the cover page or on the footer. |
Home >
Styles > set your Heading/Title Page WD 467, Page 231, Page 232 Develop a nice Header that you will use throughout the entire course; include in the header: Company Name, Logo, address, phone, email, fax, a border |
10 |
|
Do a Sales or Business Proposal - create a Title page and insert your own SmartArt or other Graphic logo with text relevant to your business. |
Insert tab > SmartArt (only works with .docx files) Page 235, Page 237 |
5 |
|
Include the Date on all projects. |
The date can be either in the Footer or near the top of the first page. |
5 |
|
Create a Watermark on page 2 relevant to your business |
Page Layout tab > Watermark However, the above technique is limiting. So I simply insert a picture, right-click it and choose Format Picture to change its position and layout to “Behind text” then use the picture tool bar to make it brighter or lighter so it looks like a watermark. Page 245 |
10 |
|
Insert a Next Page Section Break after the Title page. |
Page Layout tab > Breaks > Next page Page 250 |
5 |
|
Insert a formatted Header and Footer (on page 2 and/or 3) which include horizontal colored lines. Note: the header and Footer do NOT appear on the cover page. |
Go to page 2 > Insert tab > Footer dropdown > BEFORE you enter any footer, choose Edit Footer from the Footer dropdown > if the right corner of the footer reads “Same as Previous” click Link to Previous under the Header & Footer contextual Design tab to toggle any previous link Off. Page 259, 260, Page 261 |
10 |
|
Format the Page numbers |
Design tab > Page Numbers > Format Page Numbers Page 262 |
5 |
|
Draw a Table on page 2 relevant to your business (This whole page is a table) |
Insert > Table Page 280 |
10 |
|
Merge cells in the top row of the table (The top row of this table is merged.) |
Table Tools > Layout Page 287 |
5 |
|
Sum the last Column in the Table. The next to the last row uses =Sum(Above) (I can test this by right clicking the field and looking for the Update Field option.) |
Table Tools > Layout > Formula > Formula: =Sum(Above)] Page 265 |
5 |
|
Properly align ALL data in ALL cells in the table. For instance: Text headers over Numeric data should be right justified. |
Page 268 |
5 |
|
Chart the Table with descriptive Legends and make sure it does not say “Series 1” and “Series 2” but instead has an appropriate value for the word “Series” to define each bar or line type. |
Insert tab > Chart Page 269 |
10 |
|
Use customized Bullets in a List. (Customized bullets are not just plain round or plain square bullets.) |
Home tab > Bullets button drop down arrow Page 278 |
10 |
|
Apply the same overall business theme you will use throughout the course for your projects. If you can, Save As a PDF and upload only the PDF to the [Assignment Dropbox]. The Save As PDF add-in must first be added, and it is only available in 2007. |
For Office 2007: Page Layout > Set Spacing After to 0 so everything is not double spaced. This default setting was probably made by Microsoft to waste paper and consume more lumber for Washington state. |
5 |
|
-10 points for each spelling error during this course: right-click on red and green underlines! |
||
|
Turn in ALL your Microsoft Office assignments using Microsoft Office 97, 2000, XP or in Office 2007 format. When you save a Microsoft Word document, the file is automatically given a .doc, .docx or .pdf (2007) extension. (The extension is the last 3 or 4 letters of the file name.) Letter.wps is NOT a Microsoft Office Word document and I cannot open or grade it. (.wps is a Microsoft Works extension.) If you do not submit your file in .doc format I will not be able to read it and I will take off 20 points. I will give you one more chance to submit it in the correct format and ask you to send the assignment to me as an Angel email attachment - with the proper extension. For help on Saving see: Save As Unfortunately when viewing files in today's Windows Explorer Microsoft has decided to hide file extensions by default. If you right-click the file and choose properties you should see its extension. You can also see your file extension when you upload it in Angel. Or in the Windows Explorer you can choose Organize > Layout > click Menu bar. Then on the Menu bar choose Tools > Folder Options > View tab and uncheck "Hide file extensions of known file types." |
||
|
Total |
[=Sum(Above)] |
100 |
|
Upload the 2-3-page .doc or .docx attachment to the Angel [Assignment Dropbox]. 1. Log on to Angel at: http://scf.angellearning.com/
2. Click on [Lessons]
tab (see top of Angel window) to use the [Assignment Dropbox] and to
submit ALL of your Assignments. Submitting Homework through Angel or Pictorial view of how to submit assignments |
||